Pythonで作るアプリケーションソフトにMicrosoft AzureのSpeech SDKを組み込もうとしています。主な目的は,PPTXファイルにナレーションを組み込むアプリ(PowerpointNarrator)のテキスト入力の補助です。インストールの手順などの備忘録として残しておきます。
Azureについて
Azure(アジュール,Microsoft Azure)は,Microsoftのクラウドコンピューティングサービスです。様々なサービスの中にSpeech Serviceがあり,マイクロフォンから入力した音声データをテキスト化するSpeech to Textなどに使うことができます。
以下,参考にしたURLはその都度紹介します。
SDKのインストールの手順
Quickstart: Recognize and convert speech to text
を参考にしました。
準備
以下のような手順で進めました。
1)システム要件を確認
- Windowsの場合,64bitターゲットアーキテクチャが必要(Windows10以降である必要)
- プラットフォームに対応した Visual C++ 再頒布可能パッケージがインストールされていること
- Python のバージョンは 3.8 以降
2)Azureアカウントを作成し音声サービスを使えるようにする
私はAzureのアカウントを持っていないので,次のような作業になりました。
- Azureアカウントを作成する
- サービス用のAzure サブスクリプションとSpeech resourceを作成
- Speech resource key と regionコードを取得する
少し詳しく説明します。
・Azureアカウントを作成する
https://azure.microsoft.com/ja-jp/free/ にアクセスしてアカウントを作成しました。
Microsoft Accountを持っていることが必要です。Azureの無料アカウントは、新規Azureユーザーのみ1つだけ利用可能となっています。
必要な情報を入力し,最後にクレジットカードによる認証を求められました。あくまでも認証のためで,入金が必要になった場合は別途要求する・・・とのことです。しかし,もしこのサイトがMicrosoftを騙るサイトだったらえらいことになっちゃいます。いったん作業をやめて考えてから,もう一度やり直しました。
支払いが発生しないアカウントはカード無しで作成するようにしてもよいのにと思います。ユーザ側もきちんとサービスが働いていることを確認できれば,偽サイトではないとわかるのですから。でも,始めのうちはサービスを提供するようにした巧妙な偽サイトを作られたら,どうしようもありませんが。
・Azure サブスクリプションを作成
Azure のPortalサイトのホームで“サブスクリプション”と表示された鍵の形のアイコンをクリックし新規の無料サブスクリプションを作成しました。サブスクリプションの名前はサイト側で用意した“Azure subscription 1”をそのまま使いました。
・音声サービスのリソースを作成
ホームから“音声サービス”のページに移動し,メニューにある“作成”をクリックするとSpeech Services の作成というタイトルのページに移動します。
次の図1のように,幾つか設定する項目があります。
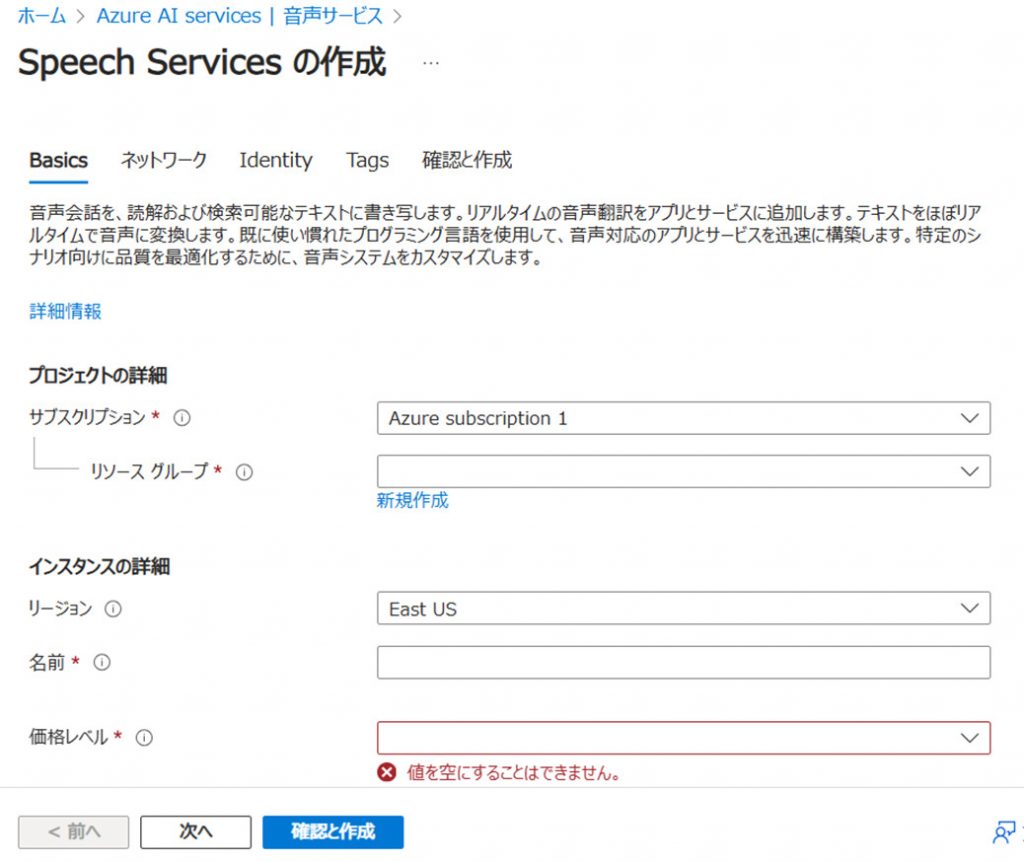
図1 Speech Services の作成ページの表示
- サブスクリプション
使用するサブスクリプションを選びます。“Azure Subscription 1”しかないので,そのままにします。 - リソースグループ
既存のグループはないので,新規作成します。リソース名はSpeech2Textとしました。 - リージョン
アカウントを持つユーザの所属する地域です。Japan Eastを選択しました。(図1ではEast USとなっています。) - 名前
適当に入力しました。ちゃんと考えて決めればよかった・・・。 - 価格レベル
Free F0を選択しました。
この後の操作で,「タグ名と値」の設定を要求されました。上の図には表示されていません(再現できなかった)。タグ名:Tag0,値:0として設定して,特に今のところ問題はないようです。
・Speech resource key と regionコードを取得
音声サービスをPythonコードから利用する際にSpeech resource key とregionコードが必要になります。これらを取得するには,音声サービスリソースのページに移動します(ホームのリソース欄でリソース名をクリック)。“キーとエンドポイント”という項目を見ます。
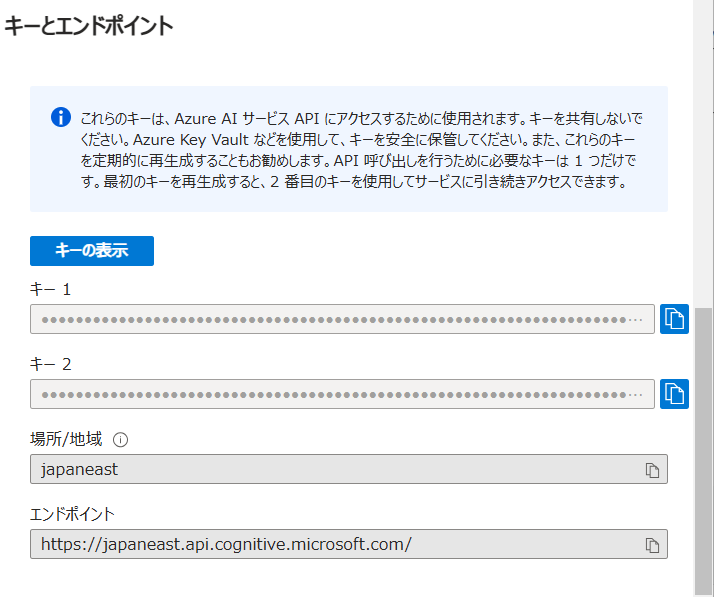
図2 キーとエンドポイントなどの設定
Speech resource key:“キー1”の右端をクリップしてをコピーして取得しました。長い文字列です。このキーは共有しないようにすることが必要なので,作成したアプリを他のユーザに使ってもらう場合には注意が必要です。
regionコードは,“場所/地域”の欄に書かれている“japaneast”という文字列です。
Speech SDK for Pythonのインストール
クイック スタート: Speech SDK のインストール というサイトの記述に従って作業をしました。
pip install azure-cognitiveservices-speech
でインストールしました。
動作確認
サンプルコードをダウンロード
動作確認するため,サンプルコードを探しました。以下の2つのファイルをダウンロードしました。
quickstart.py 参考にしたサイトのURL
speech_recognition.py 参考にしたサイトのURL
リスト1 quickstart.py
# Copyright (c) Microsoft. All rights reserved.
# Licensed under the MIT license. See LICENSE.md file in the project root for full license information.

# <code>
import azure.cognitiveservices.speech as speechsdk

# Creates an instance of a speech config with specified subscription key and service region.
# Replace with your own subscription key and service region (e.g., "westus").
speech_key, service_region = "YourSubscriptionKey", "YourServiceRegion"
speech_config = speechsdk.SpeechConfig(subscription=speech_key, region=service_region)

# Creates a recognizer with the given settings
speech_recognizer = speechsdk.SpeechRecognizer(speech_config=speech_config)

print("Say something...")


# Starts speech recognition, and returns after a single utterance is recognized. The end of a
# single utterance is determined by listening for silence at the end or until a maximum of about 30
# seconds of audio is processed.  The task returns the recognition text as result.
# Note: Since recognize_once() returns only a single utterance, it is suitable only for single
# shot recognition like command or query.
# For long-running multi-utterance recognition, use start_continuous_recognition() instead.
result = speech_recognizer.recognize_once()

# Checks result.
if result.reason == speechsdk.ResultReason.RecognizedSpeech:
    print("Recognized: {}".format(result.text))
elif result.reason == speechsdk.ResultReason.NoMatch:
    print("No speech could be recognized: {}".format(result.no_match_details))
elif result.reason == speechsdk.ResultReason.Canceled:
    cancellation_details = result.cancellation_details
    print("Speech Recognition canceled: {}".format(cancellation_details.reason))
    if cancellation_details.reason == speechsdk.CancellationReason.Error:
        print("Error details: {}".format(cancellation_details.error_details))
# </code>
5行目に
import azure.cognitiveservices.speech as speechsdk
とあります。音声/テキスト変換のサービスをするために,このimport文が必要になります。
また,9行目の,
speech_key, service_region = “YourSubscriptionKey”, “YourServiceRegion”
とあります。式文の右辺にある文字列”YourSubscriptionKey”を取得したSpeech resource keyの長い文字列に,”YourServiceRegion”を”japaneast”に,それぞれ置き換えます。
リスト2 speech_recognition.py
import os
import azure.cognitiveservices.speech as speechsdk

def recognize_from_microphone():
    # This example requires environment variables named "SPEECH_KEY" and "SPEECH_REGION"
    speech_config = speechsdk.SpeechConfig(subscription=os.environ.get('SPEECH_KEY'), region=os.environ.get('SPEECH_REGION'))
    speech_config.speech_recognition_language="en-US"

    audio_config = speechsdk.audio.AudioConfig(use_default_microphone=True)
    speech_recognizer = speechsdk.SpeechRecognizer(speech_config=speech_config, audio_config=audio_config)

    print("Speak into your microphone.")
    speech_recognition_result = speech_recognizer.recognize_once_async().get()

    if speech_recognition_result.reason == speechsdk.ResultReason.RecognizedSpeech:
        print("Recognized: {}".format(speech_recognition_result.text))
    elif speech_recognition_result.reason == speechsdk.ResultReason.NoMatch:
        print("No speech could be recognized: {}".format(speech_recognition_result.no_match_details))
    elif speech_recognition_result.reason == speechsdk.ResultReason.Canceled:
        cancellation_details = speech_recognition_result.cancellation_details
        print("Speech Recognition canceled: {}".format(cancellation_details.reason))
        if cancellation_details.reason == speechsdk.CancellationReason.Error:
            print("Error details: {}".format(cancellation_details.error_details))
            print("Did you set the speech resource key and region values?")

recognize_from_microphone()
動かしてみた
quickstart.pyを使って動作確認します。
マイクロフォンを接続して実行します。コンソールに何か喋るようにプロンプトが表示されるので,日本語でしゃべると,図3のようにテキストが表示されます。でも,英語アルファベットを使ったよくわからない文字列が表示されました。

図3 何の言語だろう?
変換の対象となる言語の設定が日本語設定になっていないためでしょう(デフォルトの言語が何なのかは,わかりません)。
もう1つのサンプル speech_recognition.pyを見ると,7行目に
speech_config.speech_recognition_language=”en-US”
とあります。ここで,言語をアメリカ英語に設定しているようです。Implement language identificationなどのサイトを見ると,この文字列を”ja-JP”に変換すれば日本語になりそうです。そこで,quickstart.pyの10行目の後ろに,
speech_config.speech_recognition_language=”ja-JP”
という行を追加して動かすと,マイクロフォンから入力した日本語の音声をテキストに変換できました。かな漢字変換もできています。

図4 ちゃんと日本語に変換された
他の言語の指定については,Speech SDKのドキュメントで確認するとよいでしょう。
以上で大体のことがわかりました。SDKのドキュメントを探して,それを参考にしながらアプリに組み込んでいく予定です。

コメント